Monday, December 31, 2012

Happy New Year's Eve!

Hey everyone! It is the end of the year 2012! Whooo hooo! Finally time to date our paper with 13's and look forward to the new year. :) Actually the New Year isn't really "big" for me but I am very excited for school to start up again! I miss HAVING to have to get up and ready for school plus doing work, hehe. And by my little winter scene nails below, you can tell that I haven't really had anything better to do than to do my nails. :)
 

Saturday, December 29, 2012

In the Stars

Follow my blog with Bloglovin
Let me lose into the stars, please! Actually, please don't... I don't have my space suit or rocket ship ready! But if I did... I probably would LOVE to go into space. It would be the coolest thing to go OUTSIDE our own atmosphere into the galaxies in my opinion! But because I don't have millions of dollars or plan to go into astronomy, I'll have to settle with some galaxy nails. :) I actually already have a tutorial for Galaxy Nail Art Tutorial so you can find that in the tutorial tab OR just click HERE. :) I haven't done these since July! I probably should have tried a different color combo but I love the purple, blue, and pink! (Not brave enough to try yellow and green yet!!) So go ahead and look below for picture spam!!
 

Friday, December 28, 2012

Who's artsy?

Ahh, I just wanted to let you guys know that I RARELY even attempt detailed nail art. :) Well, after going through Instagram for inspiration, I decided to recreate one of my personal favorites. :) This mani was inspired by @the_fashionista_blog on Instagram. Do check out her account because she is fabulous and does some of the best nail art! My recreation doesn't even compare to hers but I am still very proud of these. :)
 

Thursday, December 27, 2012

Spots & Splotches

Hello my friends! Ah! Christmas is finally over and the new year is arriving rapidly! How was your holiday though? :) Mine was pretty swell. ;) We received A LOT of snow so for me, it was a white Christmas! I was also able to spend it with my family and ate lots of yummy food and treats, so yes, it was wonderful. :) Today I have for you giraffe print nails! Haha, seems a little different, huh? Well, let's see how they turned out!
 
I don't know about you, but I ADORE this animal print!

Sunday, December 23, 2012

Curvy Candy Canes!

 That realization when Christmas is ONLY two days away! AHHHH! Oh well, I got the holiday shopping done early so no worries. ;) (Errr... perhaps I did leave out the grandparents' presents a little too late.. which resulted in a "quick" trip to the mall... which then led to buying some impulse last minute gifts...) But ANYWAY! Moving on -- How about some quick candy cane nails to spice to get us in the season! No tutorial for these babies because I just free handed them with some white acrylic paint, but want to look at my wacky candy cane stripes, by all means, continue reading! :)
 

Thursday, December 20, 2012

Present Nails Tutorial

 AHHHHH! I finally finished a tutorial for these gift wrapped nails! A lot of ladies on Instagram  asked me how I did the last present nails I did, but they were more Chrismas themed. :) I decided this time to make a tutorial, but to use different colors to show that these nails are adorable for ANY time of the year! So go ahead and take a look below at these adorable gift wrapped nails and if you're interested, keep reading for the tutorial! :D
 

Wednesday, December 19, 2012

And maybe just a bit more magic?

Hehe hey guys! After Amanda from Fashion Footing guest posted for me with a swatch of Santa's Magic by Finger Paints, I needed to use mine again! I am obsessed with this glitter... It's so sad. So go ahead and take look at the few bottle shots and nail shots of this legit glitter nail polish!
 

Saturday, December 15, 2012

Just add some magic!

Hey everyone! I am super excited to post my VERY FIRST guest poster! (Post-ER.. not a poster poster. :( Or impostor... But some magnificent lady that was willing to use her time to create for us a wonderful swatch! So please welcome Amanda from Fashion Footing! I love her blog because she swatches and shows off many, MANY nail polishes. ;) Let's see what treat she has for us today!

Hey guys! Thank you Jenna for letting me do this post! I am super slow so this took forever to get to her, so thank you for being patient, Jenna!! :-)

Today I have Zoya Shawn and Finger Paints Santa's Magic! I'm going to show you the finished product first, then I'll show you Shawn on it's own.

I started with two easy coats of Shawn, then 2 easy coats of Santa's Magic. Ummm, holy amazing! So so so holographic and awesome and wonderful and I love this nail polish!!


Jenna here again.. look at this gorgeous macro shot of Santa Magic! Thanks so much Amanda for showing this off! Who is loving this glitter and green? *THIS GIRL*
 
Here's Shawn. This is a polish I've been wanting for a long time and whenever Zoya had promos, I would always get something else instead. I finally bought it, though, and I love it. Such a great green!

 
Do you have either of these polishes? What do you think?

Talk to you soon!
Amanda

Wow! I love this combination! Yes, the green is very festive! Reminds me of a Christmas Tree. :) And adding that Santa Magic was PERFECT. Makes me want to add a little bit of my own. ;) Thanks again for taking your time to post for me! Ladies, be sure to check out Amanda's blog HERE for many more great photos of nail polish (that will make you want to spend all that holiday money or make you cry wanting to hehe ;)) and also find her on Instagram! Until next time, Your Polish Pal, Jenna :)

Friday, December 14, 2012

Gift Nails

 And just because I did these today and felt like I needed to post them right now because I need to make a tutorial because this was a hit. ;) Aren't there ADORABLE?! I promise I will make a tutorial on these present nails! They are just so cute! AND SUPER EASY. Want to see more photos? Haha keep on reading. ;)
 

Basic Christmas Tree Tutorial

Hey everyone! I FINALLY have a tutorial for you. ;) Today we are going to hopefully learn how to make some very BASIC Christmas tree nails! These are SO easy that I think that anyone can do them! The great thing about these is that you can also add virtually anything to these trees to make them even cuter. So take a look below and let's get started! :)
 

Thursday, December 13, 2012

Gimme Your Stripes

One more post of "old" nails -- I swear! I just thought these were TOO cute to pass up! I have never been able to make zebra print nails until a couple weeks ago! I am super proud of this zebra nails! I decided to just try the classical black and white zebra now and look how adorable they turned out!
 

Wednesday, December 12, 2012

Hey, Hello Kitty!

Hey everyone! I'm sorry I'm bringing back so many "old" manis that I've done in the past few months, but I just wanted to be able to archive them in my blog so I can link to old posts if I choose to redo them again. ;) But go ahead and take a look at my Hello Kitty and a couple friends nails! This is defiantly one of my first attempts at detailed nail art... Haha, I used acrylic paint for all the designs. :) Hello Kitty turned out a little weird but I think Kerropi and Sweet Corrin look adorable! And I got so lazy that I just added stripes on my other nails... Haha, sorry. ;)
 

Saturday, December 8, 2012

Phanton Cart Story (& Gradient Nails)

Hey everyone! Here are another pair of nails that I created a couple weeks ago that I'd love to share with you! I take so many photos so it's nice to be able to share them on my blog and not just on Instagram hehe. I have for you today some awesome gradient nails! If you want to learn how to do them yourself, I'd recommend check out Simple Nail Art Designs on YouTube! She's VERY sweet and helpful! I love her videos and she ALWAYS is willing to help you is you have more issues. :)
 
When I first tried out gradient nails last year, I only used nail polish. But Simple Nail Art Designs' video taught me how to do it with acrylic paint and made it so much easier! So please check out her gradient nail tutorial HERE. You won't regret it! Look how cute mine turned out ;) And only continue reading if you enjoy spam of awesome nails and a short story on how I saved my car AND another from being destroyed by a shopping cart. xD
 

Friday, December 7, 2012

Wrap it up!

Ah, it's holiday time again... Where are those bows, tape, and wrapping paper when you need it? Don't forget about those dang scissors. GRR. Well, instead of getting my wrapping paper out, I got some Saran Wrap out and created some saran wrap nails just 'cuz. ;) I love the effect of having 2 colors at the SAME time on the same mani!
 

Wednesday, December 5, 2012

Birthday Nails! (With tutorial)

Happy Birthday to you! Haaaappy Birthday to you! Haaaapy Birthday dear no-one-in-particulaaaaar! (But annnnyyyooonnne that has a Biiiiiiirthdaaaay) Happy Birthday tooooo.... yooooouuuuu!
 
 Okay, now that we have that fantastic song out of the way... Hello ladies! I am very, very sorry I haven't posted in the last 2+ weeks. You know holiday time is arriving when you have major amounts of finals in classes and everything just HAS to happen during the last 2 weeks before your break. :/ Life can be a stinker. Hehe, well in order to combat these finals blues I have for you some an awesome candle nail tutorial! (Sh. Look below, I think they look super cute and would be great for a birthday or whenever you need some funky "celebration" nails).


 I wanted to try these two different times with different colors, so I have to display a purple set of candles ;) But the tutorial I will use different colors. :p I still need to practice with some of the flames, but I think they're pretty dang cute!

Thursday, November 22, 2012

Gooble Gooble!

HAAAAAAAAAAAAAAAAAAAAAAAAAAAAAAAPPY Turkey Day my friends! :D Today I have for you a really simple turkey nail art tutorial for Thanksgiving (or any time of the year if you want to try out this cute fall idea ;)). So go ahead and take a look below if you are interested in learning how to create a cute little turkeys. And why yes, I did get one last chance to show off my little pumpkin! I really need to throw these little gourds away but they're my favorite! ;)


Tuesday, November 20, 2012

Stained Glass Nails Tutorial

Hey everyone! You can tell that I obviously have had a lot more free time lately because I've been posting more frequently. ;) Well it is that time of year again.. TURKEY DAY over here in the states! :D Mmm.. The Thanksgiving Feast is just in a couple days, so I'm off from school and have a lot more time to do my nails. Moohahaha! ;) Today I have for you some beautiful "stained glass" nails. I've seen this idea from many places but the specific tutorial that I myself followed was created by the AMAZING Emily! She doesn't blog (at the moment.. silly girl. She really should!) but she does have an Instagram where she posts GORGEOUS photos of her nails and pretty sweet tutorials at times too! So be sure to check her out, @blueemster if you have Instagram. But go ahead and take a look below if you want to learn my variation of stained glass nails. :)
 

Friday, November 16, 2012

Pretty Snowflake Tutorial

"Oh the weather outside is frightful but the fire is so delightful. And since we got no place to go, let it snow, let it snow, let it snow!"

Hey everyone! :D I know you're probably reading this and like "WHAT THE HECK?! It's not even Thanksgiving!" Well... I know that some areas in the world (including my area hehe), some snow has fallen. ;) So why not celebrate with some gorgeous snowflake nails?! (Or maybe you should keep these in mind for the holiday seasons coming up. ;) That works too!) I actually just got one of my first Sinful Colors nail polish and decided that I really wanted to try it out. But first, as always, take a look at the nails that we will hopefully be making today. ;) They're very simple and elegant. :) Oh and NO! XD I didn't take a photo with my beloved pumpkin ;) Don't get the joke? Look at my last 2 tutorials; Pumpkin Nails and Ghost Nails!

Saturday, November 10, 2012

Tribal Nails & Just A Bit of Thanks

This is going to be a lengthy post and I apologize before hand. If you're just interested in the nails, please look below. xD But if you want to read a little story of one of the nicest things that happened to me, continue to read this long post. Here is a picture of the nails. ;)


Saturday, November 3, 2012

Pretty Pumpkin Tutorial

Ahaha! You people thought I was DONE with fall tutorials!! But I'm not! Tehehe :) I tried this out today and completed it in like 5 minutes so I hope that shows about how easy this pumpkin nail art tutorial is for today. ;) So take a look below and look at these darling pumpkin nails! Nah, they're not jack-o-lanterns, but these pumpkins are still "in" for a while. ;)

Yes. I love this pumpkin.

Friday, October 26, 2012

I "Ghost-a" Do It!

It's that time of year again -- People are flocking the stores for bags of candy and children are deciding their costumes for that ONE night of the year: Halloween. Imagine, free candy?! Who wouldn't want to pass up that kind of opportunity? Well... I only have ever trick-or-treated twice and it was all for a cause! I did happen to get a lot of candy, which to my surprise, was delightful! But other than the free candy and fun makeup you get to wear on Halloween, I'm not much for it. So please excuse the lack of Halloween nail art tutorials, I never really put much thought into Halloween. Don't fret though! I'll try to do some awesome falls nails instead. ;) Even though it's about... 30 degrees here and snowing... But that's beside the point. ;) So today I have for you some adorable ghost nails! Take a look below and let's get started! :)

I love mini pumpkins -- Just saying. ;)

Sunday, October 21, 2012

I Heart Spots (& peanut butter)

Hey ladies! Wanna know a secret? ("Promise not to tell? We are standing by a wishing well!" Just kidding. I wish we were, but we're not.) I probably do my nails about three times a week but I only post the nail art that has tutorials to accompany them. But today is going to be a special occasion for a post because 1. I'm not getting many Halloween tutorials out (I've only done candy corn.. :/ I did try the spiderweb like 4 times though. Still practicing myself! I have to recommend Amber's blog because she has fabulous Halloween tutorials out right now! In fact, HERE is her spider web to find here spider web tutorial :) It's very easy, I just don't have any stripers or thin brushes at the moment to do it myself.. :p) 2. Ugh, I get off topic a lot. ;) and 3. This nail art is actually based off one my friend's tutorial! Take a look below to see what I did. :)

The spots are really funky.. I know. ;) 

Friday, October 19, 2012

Loose Glitter Nails Tutorial

*Drum roll please* Bzzzz.. Why hello ladies! :D Yes, it is time to learn how to create some beautiful glitter nails using your own loose glitter. Before you even start to try this tutorial, I beg to you read the previous post "Glitter Check" because this will ensure you that you won't end up accidentally using "bad" glitters that will ruin your entire manicure. :( And also reading the "Glue Base Method" to remove glitter nail polish would be VERY helpful. :) Don't worry, I'll make sure that the most important parts of what you need to know will be in this tutorial, but the other 2 posts would be helpful and more in depth. But enough talk, let's create some sparkly nails using your loose glitter just laying around the house! This is really nice because I don't like "wasting" my money on glitter nail polish... Com'mon, $2+ dollars on one bottle? I suppose if you use it a lot, then it's worth the money, but I rarely use glitter myself. :) Besides, in my opinion, using your own glitter is a lot more fun and makes your nails prettier than if you'd just use glitter nail polish. So take a look below and if you're interested in learning how to make these, let's get started!

Thursday, October 18, 2012

Glitter Check?

First of all -- I'M BACK!!! Ahhhhhhhhhhhhhh! I am SO SORRY girls for not posting in like... forever. I just got extremely busy and when I want to do an awesome tutorial (can anyone say LOOSE GLITTER NAILS?!), I'm not going to give up! Yes it's going to be like one of those step-by-step nail tutorials like my Newspaper Nails because I can't show you how to do it the "right" way in just a few measly picture steps! So I have literally a 15-picture "show" to present to you TOMORROW! ;) (I really should start making videos, but I just don't have a decent video taping camera at the moment. Perhaps in a few years? ;)) But anyway, I just also wanted to go over an overview of tomorrow's nails and the frequently asked questions and answers, mainly about the glitter. So if you have a question, hopefully I'll be able to answer it here.

Q: Loose glitter nails... what?
A: Yes. You heard me right. We are going to have loose glitter on our nails. What's the point? (Hey, I'm asking myself a question!) Umm, because it's really pretty and you might not have enough glitter nail polish. ;)

Q: Doesn't the glitter get EVERYWHERE?!?!
A: Very important question! If you do it the right way, no. The glitter will stay only on your nails. The process of getting it on there.. that's another story. But hopefully when you do create these beautiful nails, you have newspaper around your area so clean up will be easy! And I'm just going to start predicting your next question on HOW DO YOU GET THE GLITTER TO STAY?!! (That's what you were going to ask next, don't deny it. ;)) Well, with a little bit of white Elmer's glue and a little bit of clear nail polish, it'll stay on perfectly. I'll get into the details tomorrow!

Q: How in the heck do you take it off?!
A: Check out the easiest way to remove glitter here. This is going to be your very base before you put ANY polish on. Just trust me. Once again, I'll explain the details tomorrow. :)

Q: How long exactly will it stay on?
A: I had mine on for about 4 days but got bored with them so I peeled them off (it's so fun... ;) I love the glue method :)), but I'm sure it'll stay on longer if you really wanted them to.

Q: Where did you buy the glitter?
A: This glitter is the "Recollections" brand which I just bought at Michael's. I think I got 16 bottles (not sure exactly how many ounces, but it's A LOT of glitter) for like $14. I'm sure though most any store will have glitter and you can use virtually anything. Well... we'll get to that. ;) That's actually the MAIN point of this post is to show which glitters work and which ones don't.

So speaking of which glitters work and don't work... Let's get talking about that subject! It's hard to explain in words to find a glitter that doesn't have the dyes "bleed" by checking with clear nail polish. Making sure your glitters won't bleed is crucial for this tutorial because on the nails, you're going to have to put multiple and I mean like 8+ coats of clear nail polish on your nails. And THAT is what keeps the glitters in and makes it really shiny and pretty. So what glitters should I use?
If you already have some glitter in mind that you'd just LOVE to put on your nails, let's make sure first that it's a "good" glitter. First place just a little bit of your glitter onto a scrap piece of paper. (Make sure the paper is kinda thick or fold it in half to make it thick so just in case it's a BAD glitter, the colors won't leak everywhere). And by a good glitter, I mean one that doesn't bleed out the colors and get all messy! This will be the 2nd time I've tried out the loose glitter nails, and the first time I wanted this gorgeous purple. But let's watch at my fail... 
Now with a clear nail polish (I used just a clear by Color Club, but ANY clear polish will work), just place a drop onto your glitter. Watch for it, watch for it! 
And see as I swirl this gorgeous purple around, it bleeds this yucky magenta! Perhaps under other circumstances, I would actually enjoy this color. But remember, when I first did this, this glitter was ON my nails and the clear nail polish brush turned this color too... Yuck. That was a heart breaker. I hope you can see this color is a BAD GLITTER to use for this technique. So let's try some more glitters. And by the way, this is Muse by Recollections, so it's not only the brand, it's the also the color. 
And here I have in the middle is a pretty medium pink called Raspberry and the gorgeous dark blue is Marine, also by Recollections. I don't have glitter from other brands, so if you do try the tutorial I'm going to post tomorrow, so let me know what brand of glitter you used! And if it was chunky or fine! I really want some chunky gold glitter nails, maybe for Christmas! :D Anyway. Here are 2 other glitters we're going to try and see if they're good or bad. 
Drop of clear nail polish 
Swirl around with a pencil (toothpick, cotton swap, or whatever you have) and lookie here! Neither the pink NOR the blue bleed! Yay!! We have some winners!
 
So the whole point of testing the glitters were to make sure when you put them on your nail, it won't get really gross and messy like what the purple did. I wish I did this before when I first tried this out! Be sure to test your glitters!! :D And last question you're going to ask is..... What are we going to learn tomorrow?!?
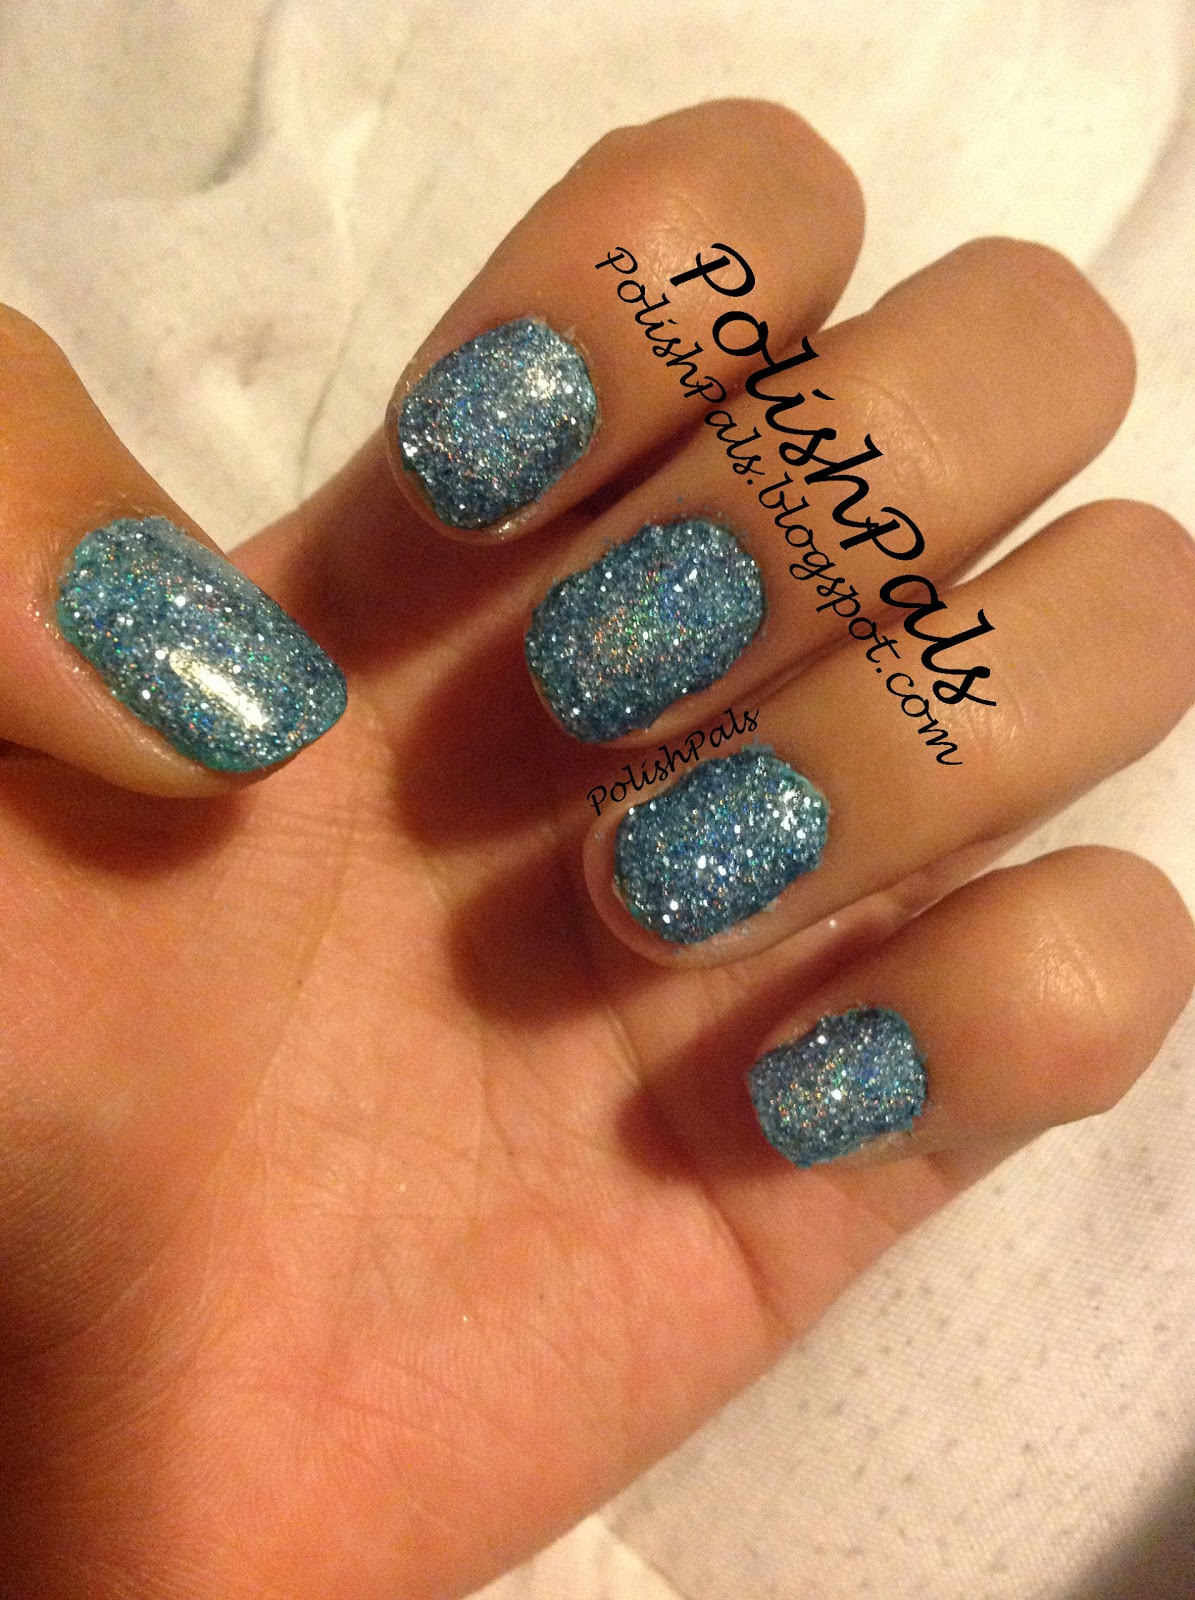
Does this look appealing enough to you? Yeah, I have better pictures of the end project, but just look at that glitter!! This is PERFECT for one of those dances or parties you'll be chilling out at or just want to play with glitter because... Glitter makes everything better. Everything. Okay. Maybe not everything... Meh. MOSTLY everything. ;) So! Until TOMORROW, Your Polish Pal, Jenna
 
And let me know if you have anymore questions by emailing me at yaypolishparty@gmail.com, KIK @PolishPals, or Instagram @PolishPals. :) I'd be happy to add to this post! So just let me know! <3

Sunday, October 7, 2012

Classical Cheetah Nails

Hey everyone! It's been a VERY busy week. Unfortunately, I don't have an original tutorial, but I hope you don't mind because I have recreated a pictutorial of the cheetah print :) I don't have step by step pictures, so  check out my the Cheetah Nail Tutorial for the full tutorial. Here are my classical cheetah nails. :)
I used Jaguar (ironic!!) by Pure Ice for the base, Harvest Moon by China Glaze for the spots, and Black Heart by Sally Hansen for the black lines and dots. The only 'tool' I used was a mechanical pencil.
Here is just Jaguar. This is a really pretty pale, metallic gold. It does have some small white glitter pieces, but you really can't tell that much. I bought this at Walmart for $2.  
Another shot with the bottle. :)
Okay, here the new updated cheetah nail tutorial. :) This is only a pictutorial, so if you want to know how to do this exactly, check out my Cheetah Nail Tutorial post.
And a close up of how my nails looked this week. Quite classical and sexy nail art. ;)
Sorry for the photo bomb! I just really, really liked these!
Have you ever had a webkinz? Yes, this did really inspire me. ;) I believe this is a Jaguar though... Her name is Jasmine haha! I just liked the colors. ;)
And they match!
 
Okay, I'm done photo bombing you! I hope that I'll have time to create a few Halloween tutorials soon! If you have any suggestions, let me know! :) Until next time, Your Polish Pal, Jenna :) <3

Friday, September 28, 2012

Dry Watermarble Tutorial

Yes. You read that right. DRY "watermarble" tutorial. What?! Dry? Where's the water? Exactly. Today we are going to learn how to create the marbling effect with out the hassle of water! I'm sure a lot of you have seen gorgeous watermarbles and have always wanted to create them, but they're honestly just a LOT of work and mess and you waste a lot of nail polish trying. At least that's the way when I do it. So let's try a new technique called dry marbling! As always, look below. :) Warning right now -- This is going to be more of a "learning" tutorial more than "Hey look at my pretty nails" because this was the first time I tried this technique out, and the tutorial is the important part haha. For way better photos and the gal I learned this from, check out MakeupMyLack Marble Without Water Tutorial HERE. :)
I am so sorry about my pointer finger nail... It took a hard hit a few days ago. :( Dang it. But hopefully you can tell that the linear marble effect is pretty cool. ;) 
Let's get started! So for marbling without water tutorial, you will need a plastic baggy (I used a sandwich bag, but I think you can use Saran Wrap or any other similar surface as well), a toothpick (I used a mechanical pencil since I was out), 2 nail polishes at least (I used Smoke and Ashes by China Glaze and Silvivor by Wet n Wild), and some scissors or cuticle clippers (which I forgot to picture). MakeupMyLack did use the cuticle clippers but I don't have any. So I used some super tiny emobroidery scissors. You can also use some "child" or any other small sciccors, but it'll be just a bit harder to use, but it works! I tried it out on a couple nails. ;) 
There are just too many pictures that it'd be silly to post them all so I made a collage. :) Basically, once you have gathered your materials, I'd suggest ripping your plastic baggy into halves so you use both sides if you need more space to start with. ;) Now get your polishes ready to paint! As you can see, I just used 2 colors. You can use as many as you'd like, but I prefer just 2. ;) So let's start! Make a THICK line onto your plastic baggy. How long? Just as wide as your nail is. And by THICK line, I mean glob a lot of nail polish on it. When it dries, the polish will thin out. You want it to be thick when you start with so that it doesn't break when it dries or is too see-through. That's why I suggest using thick nail polishes, not watery ones. Next you'll just continue adding lines in the same fashion. Paint them thick! Just continue until your number of lines is as long as your nails. I made 4 lines. :) Now, we are to step 5. Using your pencil (toothpick), gently drag it through the top to the bottom. And go ALL the way through -- Do you see how I stopped? Yeah, that's not good. You want to go all go from tippy top to the very bottom. And you'll notice your first color makes a line. Repeat this process but this next time go from bottom to top and then repeat step 5 again. I did this 4 times to make 4 lines. Step 9 is just saying to let dry. I think the safest thing is to let them dry overnight, but you could check after 3 hours. Now repeat this process to make enough for all your nails plus a few more if you make a mistake. ;)
Here are how mine for my left hand turned out. Yes, even I had to practice a few times. ;) Another good reason why to make extras are to use as "checkers" to see if the other ones are done drying.
Now you want to GENTLY peel these little... dried up nail polish designs off.
I peeled this little guy off and now will use it. :)
Okay, you're going to want to paint your nail a base color to make it nice and sticky so that the design will stick. Yay, I have I need a Re-Freshmint by Wet n Wild on already. I was too lazy to take it off and for my color combo, the black and silver was going to color it so I didn't really care haha. So I am applying just a clear base coat on top.
Stick your nail design on top of your wet nail. (Yeah, do these one at a time ;))
This is the trickiest part and the most work. But if you do it right, it's worth it. So you want to trim the excess design off with your tiny scissors. Don't worry about the bottom (around your cuticle) because I just cleaned up using the q-tip method. :) Didn't feel like dangering my skin by cutting around it!
After clean up, you'll want to apply another clear top coat on top to your beautiful marbled design!
Hehe.. "One of these is not like the other, one of these things just isn't the same." ;) Part of the song from Sesame Street! Anyway! Look how cool that one finger is. ;)
And here is another picture of the final result!
 
I am SOOOOO trying this technique out again! I apologize for the wonkyness of this one, but like I said earlier, this should be more focused on the process. My nails just aren't very long for this design at the moment *cough cough* POINTER FINGER. ;) So I hope this really helped you and you can actually do anything with this "dry" technique. Say you want some pretty flowers but still aren't comfortable with painting them on your nails? (Especially your dominant hand) Well, just paint the design, MAKE SURE IT'S THICKLY APPLIED, let dry, peel and "glue" on with clear nail polish! This "dry" technique can be used for many things. ;) Oh and since this is dry watermarbling with a plastic bag, you can make ANY type of marble. I just liked the linear type, but you can sure throw in some swirls or just random patterns! Let me know if this worked for you, and until next time, Your Polish Pal, Jenna :)